Mar 27, 2024Last modified July 13, 2025
React Deep Dive
React Key Milestones - Feature Timeline
JSX
- Initial versions of react did not have support for JSX.. It simply provided APIs like React.createElement() to create react components and an efficient way to render these components to the DOM using virtual DOM.
- Here's an example of how you would create a react component using React.createElement() -
- As we start adding children to the component, the code starts becoming unreadable and hard to maintain.
- JSX was introduced to make React code more readable and HTML-like, but under the hood, it still compiles to these createElement calls. JSX is just a syntactic sugar for the React.createElement() function.
- JSX gets transpiled by babel to React.createElement() calls. Babel needs our component names to be capitalized, so that it knows that it's a component and not a DOM element / normal html tag.
- The reason we can only have on root element in JSX is because how we use the React.createElement() function. It takes three arguments - type of the element, props and children.
- The core react package is platform-agnostic, while react-dom is specifically for web browsers. There are similar packages like react-native for mobile development.
Synthetic events
- React built a event system which works across all browsers. For all events which are supported by the browser, React creates a synthetic event object.
- In React, a synthetic event is an abstraction layer that React provides to handle events in a consistent and cross-browser-compatible manner. Synthetic events are not native DOM events; instead, they are JavaScript objects that wrap native events.
- React handles events through an event delegation mechanism. Event delegation means that React doesn't directly bind event listeners to each DOM element. Instead, it binds all event listeners to a single root node (usually the document or the root container of the application).
- When a user interacts with the page and triggers an event, the event bubbles up the DOM tree to the root node, where React captures the event and wraps it as a synthetic event.
- A key mechanism behind synthetic events is event pooling. Event pooling means that React reuses event objects instead of creating a new event object each time an event is triggered. When an event occurs, React takes an event object from the event pool, initializes it, and passes it to the event handler. After the event handling is complete, the event object is cleaned up and returned to the event pool for reuse in the next event.
createRoot()
- createRoot is part of the react-dom package. It is used to create a root for a react app.
- It takes the host container element from your application DOM as parameter. This is the DOM element that you expect to render the react app into. The second optional argument of createRoot is an options object.
- Here's the formal function definition for createRoot:
- Internally, createRoot checks if the container element is a valid DOM element. If it is not, it throws an error.
- createRoot then creates a container object with instances of FiberRootNode, FiberNode which are linked together.
- After injecting ReactDispatcher and listeners for different events to the root container , createRoot function returns a ReactDOMRoot object. The returned object has the render and unmount methods.
render()
- You can find the implementation of render() function here.
- The render method is defined as below -
- We can pass one or more react elements to the render method and it will recursively render the elements to the DOM.This is done using the updateContainer function.
- Internally, it will create an update object for the Fiber node and then queue it to the root._internalRoot.current.shared.pending while referencing children as element into its payload.
- The updates to the DOM are scheduled via microtask queue. The work-loop is the process of rendering your components and displaying them on the screen. The loop is triggerred by several actions: root.render(), components updates, recovering from suspense... etc.
React Fiber
Shoutout to the OG article on React Fiber
React Before Fiber
- In initial years, react used to use the reconciliation algorithm to differentiate between the old and new DOM tree and then update the DOM accordingly. Basically each react app was internally reprentented as a tree which is compared against the previous tree to determine the changes. Once the changes are determined, the DOM is updated accordingly, as a part of rendering. This is called the reconciliation algorithm.
- The reconciler did the work of determining the changes and the renderer did the work of updating the DOM. Before React 16, the reconciliation and rendering were done in the same phase.
- As the reconilition and rendering were done together, new changes couldnt be added to the reconciliation until the current reconciliation was complete. This led expensive computations to slow down the app experience for the user.
React After Fiber
- The reconciliation and rendering is no longer done in same phase.
- Fiber supports prioritizing different updates by splitting rendering work into chunks that can be spread across multiple frames. React calls this incremental rendering.
- With fiber, react now first makes a list of changes that need to be made. Once this list is created, then the changes are scheduled for rendering.
- React then selects the set of scheduled changes which needs to be prioritized for rendering and commits them. This is called the commit phase. Once committed, the DOM is notified to render the changes.
Fiber tree and Fiber Nodes
- The React fiber reimplements the reconciliation algorithm using the concept of fiber.
- A fiber is a javascript object that represents a unit of work. It contains information about the component, its state, and its position in the tree.. You can view how fiber node is defined here.
- A Fiber tree is a data structure that represents the state of a React application. Each node in the tree a Fiber Node contains following properties:
- In React Fiber, there are two fiber trees that work together to enable efficient updates and concurrent rendering:
- Current Tree: This is the tree that represents the current state of your application. It's the tree that's currently being rendered to the screen.
- Work-in-Progress (WIP) Tree: This is a tree that's being built as you update your application. It's a copy of the current tree, but it's being updated as you make changes.
- The trees are linked - each fiber node has both current and workInProgress pointers to its counterpart in the other tree.
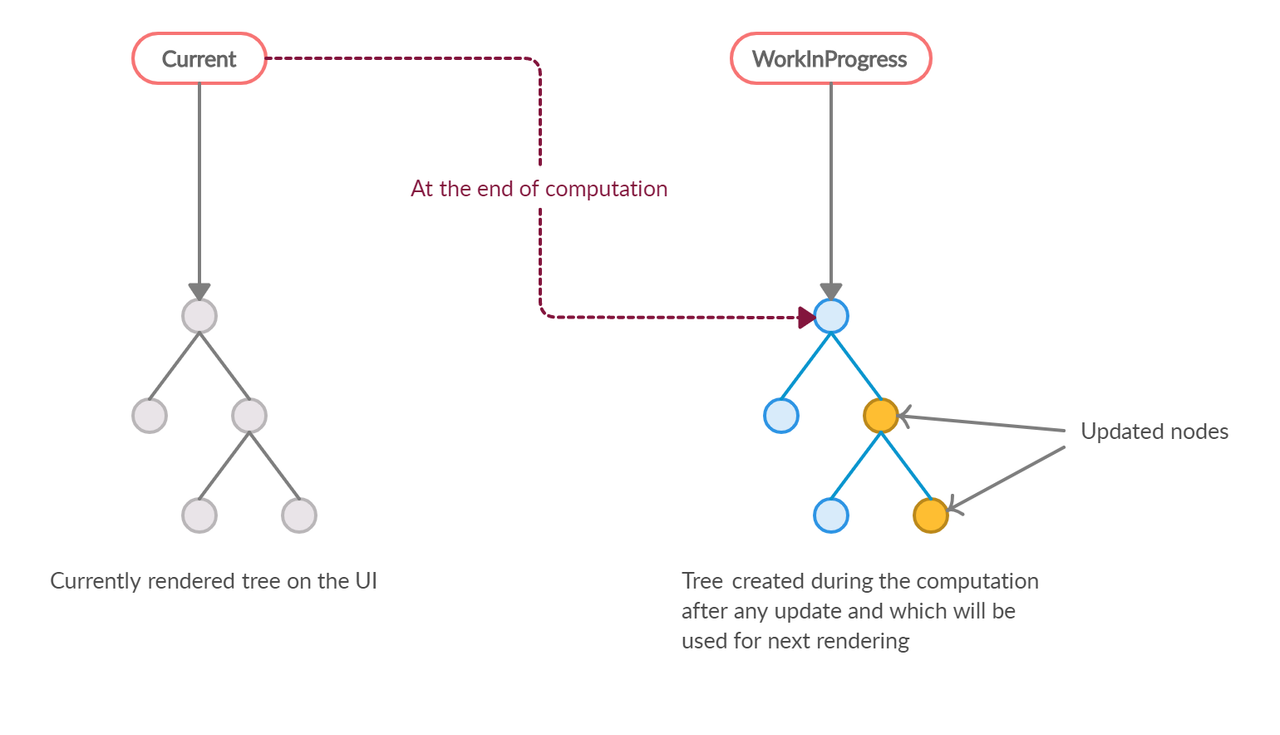
- When the current render phase completes:
- React commits the work-in-progress tree to the DOM
- The work-in-progress tree becomes the new current tree
- The old current tree is discarded
- For the next update, React creates a new work-in-progress tree
- React organizes these DOM operations through specific commit functions:
- React directly manipulates the DOM using standard browser APIs, but does so in a highly optimized and batched manner during the commit phase.
Work Loop
- Work Loop: Instead of synchronously rendering the entire component tree, Fiber uses a work loop that can be paused and resumed. React processes fibers one at a time, checking if it has time remaining in the current frame.
- It's a scheduled function that processes fiber nodes incrementally while respecting time constraints.
- How it works ?
- Time slided execution : React gets a time slice (typically 5ms) from requestIdleCallback.Processes fiber nodes one by one until time runs out. Yields control back to browser for other tasks (animations, user input)
- Unit of work processing: React processes a single fiber node (unit of work) at a time.
- Traversal algorithm: React traverses the fiber tree using a depth-first traversal algorithm.
Lanes
- React uses a lanes-based priority system where different types of updates get assigned different priority levels:
- Different events and updates are assigned different priority levels based on their importance.
- When a fiber node is updated, it inherits the priority from the update.
- Priority in Practice:
Component Lifecycle
Class based components
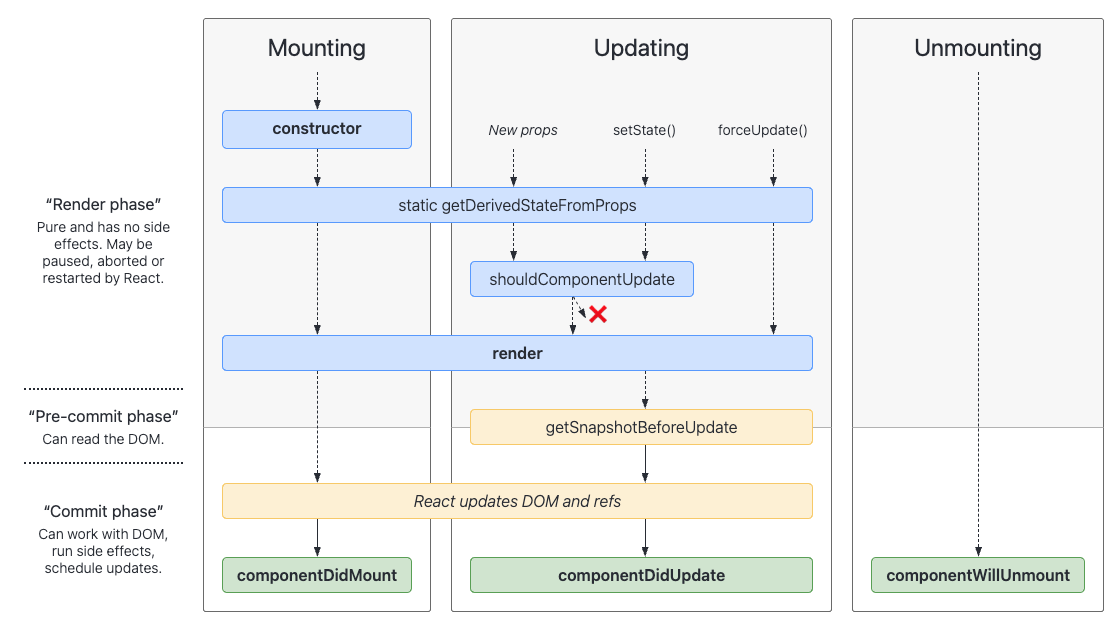
- Initially all react components were class based ie. defined as javascript classes. Every component goes through three different stages - mounting, updating, unmounting.
- When the component is created, it goes through the mounting phase. During this first the constructor is called. This is where generally you would initialize the state and bind the event handlers.
- Then the render method is called. This is the method which actually returns the JSX that will be rendered on the screen.
- Once the component is mounted on DOM in commit phase, the componentDidMount method is called. This is where you would typically do any side effects like fetching data from an API.
- During the updating stage, the component receives new props and state. shouldComponentUpdate method decides whether the component should update or not. If it returns true, the component will update. If it returns false, the component will not update.
- Once the component is updated, the componentDidUpdate method is called.
- Finally when the component is unmounted from DOM, the componentWillUnmount method is called. This is where you would typically clean up any resources like timers, event listeners etc.
- Below diagram shows the lifecycle of a class component.
Functional Components
- In React, functional components are functions that return JSX. They have become the preferred way to write components in React since the introduction of hooks in 2019.
- Functinoal component dont have lifecycle methods. Instead, they use hooks to add functionality to the component.
- useState hook enables state management in functional components. Its equivalent to constructors in class components.
- useEffect hook enables side effects in functional components. Its equivalent to componentDidMount, componentDidUpdate, and componentWillUnmount in class components.
hooks
- A hook is stored inside React as a plain object with the following properties:
- The next property in hook definition references the next hook your component uses. Thus, hooks are modelled as a linked list.
- Lets take an example component -
Here's how the hooks linked list will look like for this component -
Refs
- When you want a component to “remember” some information, but you don’t want that information to trigger new renders, you can use a ref.
- Refs can be created using the useRef hook. useRef returns a mutable object with current property. The current property is initialized with the argument passed to useRef.
- Refs are useful for storing mutable values that don’t trigger re-renders. You could point ref to anything: a string, an object, or even a function.
- Generally refs are used to store references to DOM elements. This is done to programmatically access and interact with/modify the DOM elements. Some of the example usages are setting focus on an input, control media elements, trigger animations etc.
- You can store a reference to a element in a ref by passing to the ref prop of the element.
Context API
- Props are primary mechanism for passing data between components. However, when the data is to be shared in the deeper levels of tree, passing props can become cumbersome and error prone. This is because the data needs to be passed through all the intermediate components. This problem, known as prop drilling, is solved by using context API.
- With context api, the parent component can create a context and then wrap the child components that need access to the context in a context provider. The context provider component can then pass the context to its children via the value prop.
- The child components can then access the context by using the useContext hook. The useContext hook takes the context object as an argument and returns the current value of the context.
Creating Context
Consuming Context
- Some of the common use case for context api are - app state management, theming, authentication etc.
Suspense
- React Suspense components lets you show a fallback UI while waiting for a component to load.
- Its generally used in combination with React.lazy to load components asynchronously. Note that React.lazy only works with default exports and for client side rendering.
- If you are using NextJS, then you can use dynamic import() to load components asynchronously. Next.js dynamic() is a enhanced version of React.lazy with SSR support, built-in loading states, and Next.js optimizations
- Lazy load where it makes sense:
- Components in modals/drawers
- Route-based components
- Feature flags/conditional rendering
- Heavy components not immediately needed
- Don't lazy load everywhere:
- Critical above-the-fold components
- Components always rendered on page load
- Small components where the overhead isn't worth it
- The component itself isn't "lazy" - the loading mechanism is lazy. Once loaded through any method (lazy or regular), the module is available for all other usages without additional network requests.
Error Boundaries
- Error boundaries are React components that catch JavaScript errors anywhere in their child component tree, log those errors, and display a fallback UI instead of the component tree that crashed.
- There is currently no way to write an error boundary as a function component.
- Error boundaries only catch errors in child components, not in the boundary itself. They don't catch errors in event handlers, async code, or during server-side rendering
- For event handler errors, use regular try-catch blocks.
Design Patterns
Container / Presentation Components
- This is one of the most common design patterns in react. The core concept of this pattern is to separate the application logic from the presentation logic.
- The container component is responsible for fetching/organizing the data and the presentation component is responsible for rendering the data.
- The presentation component focuses only on rendering the data and does not have any state.
- With the introduction of hooks, the container component can be replaced with a simple data fetching hook.
Higher Order Components
- The HOC pattern is really helpful in sharing a piece of logic across multiple components.
- The HOC pattern is a function that takes a component as an argument and returns a new component. The new component is a wrapper around the original component.
- e.g lets say you want to add a feedback link to different screens in your app, you can create a HOC that takes a component as an argument and returns a new component with the feedback link.
- Best use-cases for a HOC:
- The same, uncustomized behavior needs to be used by many components throughout the application.
- The component can work standalone, without the added custom logic.
- Best use-cases for Hooks:
- The behavior has to be customized for each component that uses it.
- The behavior is not spread throughout the application, only one or a few components use the behavior.
- The behavior adds many properties to the component
Render Props
- Render props is a pattern that allows you to share code between components using a prop whose value is a function. The render prop is a function that returns a React element.
- Generally you would use this pattern when you want to enable the consumer component to control the rendering of the component.
- Lets say you have a products component which shows a list of products. You want to be able to render the products in a different way depending on the context. For example, you want to show a list of products in a grid or a list. You can use render props to do this.
- The consumer component can then use the render prop to render the products in a different way.
Provider Pattern
- The Provider pattern is a pattern that allows you to share state between components without having to pass props down the component tree or are siblings.